Showing posts with label IABN. Show all posts

Saturday, 16 July 2011

Taking pictures of minis

It's a pretty important aspect of this hobby. I've tried different methods, various types of lighting and backgrounds and after lots of experimenting I'm now more or less happy with how my pictures look in the end.
Since I have my work space set up in the attic, lighting is a key issue. As you can see in the picture below, the main source of light comes from a roof window.


It's really a great thing as it allows me to maximize the time I work in daylight. On the other hand, the sun rays hit it directly so during the day it gets a bit too bright for taking pictures. In broad daylight light seems to be bouncing off the models that are photographed and as a result the photos show minis very inaccurately.
Using the old fashioned trial and error method I found that pictures look much better when they're taken early in the evening/late in the afternoon during a sunny day. Still, even then I need to use a white sheet of paper so that the light doesn't hit the photographed minis too strongly. This primitive blende helps distribute the light better.
Now let's have a close look at the photo setup.


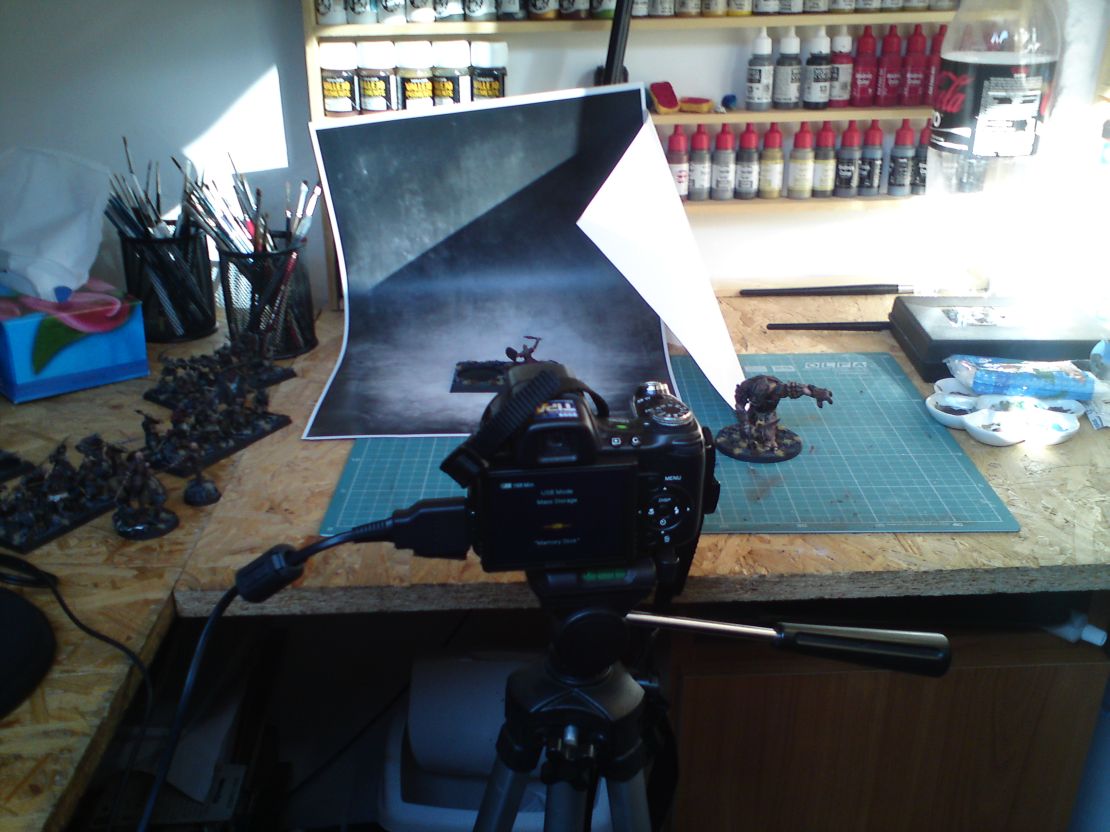
As some of you may instantly recognize, I use a photo background from Massive Voodo (here's a direct link). I also usually use a tripod as even the slightest move of hand can ruin a photo. That, combined with using self-timer means that the pics are hardly ever blurred.
I use a Sony DSC-HX1 digital camera. It has a resolution of 9.1 megapixel and a pretty decent lens. As far as options are concerned, everything's very automatized and the camera automatically switches to macro (it sometimes even switches to a face recognition mode when I do close ups ;). The only option I always keep switched off is the flash light as once it hits a mini when a photo is being taken, only the most protruding elements are clearly visible.
I also have a small light box (30cm) but after several unsuccessful attempts I basically gave up on it. Maybe if I placed it on the desk right under the source of light it would work better but I don't really feel encouraged to try, especially taking into account the fact that the backgrounds I have printed are too large and don't fit inside.
I think I get pretty good results when I take pics when the daylight is just fine. Doing it at night is something that I've tried several times but never got good results.
So there you have it, this is how I take the pictures you see in my posts on this blog. If you have any comments/suggestions, feel free to write them in the comments section.

Monday, 11 July 2011

Skarlock


It felt nice to paint something non-Lotr after a longer time. I decided to paint at least one model for my Cryx army since I was waiting for the black primer I ordere to arrive anyway.
Skarlock is a mini that originally got me interested in WARMACHINE. I absolutely love the sculpt, it seems to be completely out of control. Putting it together wasn't so easy though, especially fixing the gaps on the soul token left after gluing it.
It was a fairly quick paintjob as it took me one evening and one morning to complete it. I kept the colors dark with the addition of very light green on the soul token. I used similar technique to the one I employed while working on Tartarus, only with smaller amount of blue and much more green. I also used some purple as a base color for the skin, working it up with white.
And that's pretty much it. I have only one more model in my WM backlog but I'll get to it a bit later. I have a few (nine to be precise) Nazgul to deal with. I'm still waiting for the remaining three but the rest is now ready for priming after being filled with quite a lot of GS but I'll write more about it tomorrow.

Friday, 13 May 2011

Erebus

PP has finally released pics of Scaverous's helljack - Erebus. Looks pretty cool, especially for an upgrade kit. The only potential problem I see with it would be incorporating new elements into my jack.


The way it's put together makes adding new elements (removable of course) pretty tricky. Also, it would be nice to make Erebus stand out a little bit more (just like in the PP's version - those runes or whatever it is on its armor look pretty cool). I guess I'll simply end up buying the upgrade kit and getting hold of another plastic set or a metal Slayer/Reaper and work on this one separately.

Monday, 18 April 2011

Lord Exhumator Scaverous

I'm lost for words so just to keep it short, here's the pic of Lord Exhumator Scaverous in his full undead glory:


A few more words from his description:
A specialist in the acquisition of lore from the dead, Lord Exhumator Scaverous is one of the most potent and intelligent servants of the Nightmare Empire. Souls are both ammunition and fuel for Scaverous. Those he slays and casts aside are fortunate compared to any possessed of special lore, whose skulls and souls he preserves for horrific necromantic interrogation.
Make sure to check out the PP website for a 3D view.

I love the sculpt, great that PP released an entirely new model that does not bear striking resemblance to any other Cryxian casters/jacks.

Thursday, 14 April 2011

New Bane Thralls

At this point I'm glad I started with buying Bane Knights as Privateer Press has just revealed the version of these minis. My guess is that they're plastic. Should look great on the battlefield, especially with the unit attachment.
I'll probably get them sooner or later. Anyway, here's a pic.


More (including a 3D rotation view) can be found here.

Saturday, 9 April 2011

Pistol Grip Pump

I'm currently waiting for a batch of minis I ordered a while ago at Maelstrom games (a Skarlock, new jack and some minis from a new skirmish system that I want to get into - more on that soon ;).I should get them somewhere around next week. Until then, I'm idle as far as hobby is concerned. No commissions and no backlog - feels a bit weird. Still, I haven't posted any pictures of the second Pistol Wraith.
I love the idea of dead gunslingers who roam the battlefield. They aren't powerful but combined with Denny's debuffs and the ability to ignore obstacles in their way can make them annoying.
I've already painted the second version of Pistol Wraith and wanted to use a different color scheme on this one. I wasn't happy at all with the cloak (which in fact constitutes most of the mini) until I've highlighted the edges using much brighter colors. It's definitely not my best work but still I guess it looks OK.


I wasn't able to find a song that would suit the character of the model but so this one will have to do.

Thursday, 17 March 2011

Wraith Engine is here!

Yes, finally, PP has released pics of a painted version. Sheer awesomeness if you asked me. I totally dig the model, it has an eerie alien look to it, while still being "cryxian" enough. Great job PP, can't wait to lay my hands on this one!


Make sure to check out the official PP website for a 3D Rotation.

And here's a nice little song to get you in the groove, feel the wrath :]

Sunday, 13 March 2011

Gorman Di Wulfe


Had a solid painting session with my younger brother yesterday. I managed to paint one complete mini during a late afternoon/late evening sit-down. Gorman should make a very helpful addition to my slowly (but steadily) growing Cryx force. He should add some firepower with his grenades and the his Smoke Bombs should provide some cover for my caster.
It's so much more enjoyable to work on one mini at a time instead of painting a larger batch of models simultaneously. It allows you to plan better and focus more closely on highlighting everything in a more coherent way.
I started by preparing a base. I used wine cork for the stone. Putting Gorman on it gave the model a little more dynamic pose. I also usually start painting the base first as I do it mostly using the good 'ol drybrush technique, which makes getting unwanted traces of paint on the model all to easy. Still, at this stage it's not a problem.
I wanted to paint him using mainly dark shades of brown and gray with some blues and greens to add a little variety. Only the lenses on his mask were painted with red highlighted to yellow as I thought a little bit of a warmer color should fit in nicely (the frontal silver piece looks much brighter in the pic than irl). I also wanted a color scheme that would match my other painted Cryx units.
Overall I'm pleased with the effects though I didn't manage to take a picture that would show everything well. Probably too much light today and that's why the model seems to be a bit too shiny (even though I used an anti-shine matt varnish).
As you can see I also painted the marks for front and back arc on the rim of the base. I've seen different approaches to it, some that I didn't like too much (like painting half of the rim in a different color). I went for a quick and easy solution ans simply added two thin vertical lines on the sides of the base. I highlighted them so that they are clearly visible but at the same time don't affect the overall look of the model.
And as a bonus, a mini that my brother started painting. It's still a work in progress but I really like what he's done so far. His Idrian Skirmisher Chieftain is coming along nicely so far.


Now back to the brush, since I am currently on a sick leave, I plan to deal with my backlog (only one WM model remaining !!).

Tuesday, 1 March 2011

Jack in the Box part III


I've recently completed my biggest WARMACHINE hobby project - fully magnetized Cryx helljack. I posted a few WIP pics a while ago. Painting it was very enjoyable, though a bit tiresome at times. Working on several similar models (or rather parts in this case) can be a bit tiresome.
I can't really say which one I like the most as they all turned out OK (at least in my humble opinion). I guess Slayer has to be my favorite here. I am quite happy with the dynamic pose I managed to put this one into. You can see him in the pictures compared to the metal version I painted a few months ago.
Painting these guys assembled would be a pain in the neck. Their weapons have so many details placed at weird angles that reaching them with brush would be virtually impossible. The sculpts are pretty much out of control and Corruptor is a good example with his Necrojector and Sludge Cannon.
I have to admit that I didn't really do my best with the painting on these guys. Not my best effort as I was rushing things a bit. Still, I just wanted to get a solid 'tabletop' look without cutting corners too much while painting.
The Reaper looks a bit like some kind of beetle. At least this was my first thought when I put him together. I left Malices' addition to the harpoon glued permanently as making this part detachable would be pretty tricky.
Malice was the hardest one to work with as it took me a while to come up with an idea to incorporate all the elements. Magnetizing the soul tokens and placing the magnets randomly on the main body did the trick. I wanted the soul tokens to be very bright and stand out against the dark color of armor. I did it this way to make sure they are distinct enough and easy to notice while gaming (it's so easy to forget little details like extra tokens in the middle of a challenging game).
I used Vallejo pigments for the rust effect. They are very easy to use and they give a pretty realistic rust effect. Combined with a pigment fixer (definitely a must while working with natural pigments), they don't chip off easily.
So, here it is, once again in its full unholy glory:


Thanks for reading and watching. Any kind of feedback is appreciated :)

Saturday, 12 February 2011

Jack in the Box part II


I've finally put together my plastic helljack and magnetized it. I will briefly describe the whole process in this post.
The first thing I knew I wanted to change was the pose. I've already worked on one cryxian jack in the past and wasn't happy with how static he looked like in the end.
Working with plastic posed some potential problems. I knew I wanted to somehow bend his legs. I was racking my brains until I came up with a simple yet effective solution - water. It turned out that putting plastic parts in boiling water makes them very flexible. Bending them into virtually any form becomes a piece of cake. One thing worth noting though - once you've bent it and are happy with the pose, immediately put it under cold water. Otherwise it may bend itself back. As you can see in the picture above, one leg has been stretched considerably.
It was also important to bend the feet so that they would fit the sloping rocks I used on the base. I also used pliers and slightly twisted the lower part of his body to add a little more dynamics to the pose. Once I've dealt with the legs, it was time to start working on the magnets. I won't go into details here as there have already been plenty of very good step by step tutorials on how to do it. My main problem was that due to lack of specialist tools (electric drill would have come in handy...). I needed to get the work done with the use of a regular hobby drill and hobby knife. It was a painstakingly slow work.
In the end I had to use modelling putty to fill in the crevices left after cutting out the holes for magnets.
I also added some scratches to the armor. If you're wondering about the sand glued randomly to the armor, it's going to become corrosion in the painting stage. It's actually not my idea - my brother (who is a layman in the field of hobby but is a smart guy who has lots of good ideas ;) suggested adding something or somehow roughening the surface covered by rust. He made this suggestion after looking at my painted bonejacks and I immediately saw potential for following his advice.

In the pics you can see the effects of my work. I'm particularly pleased with the Slayer. It's easy to see that the extreme sculpt version was my main source of inspiration here.


The Corruptor and Reaper were also fun to work with. Initially I was worried that the magnets may be too weak to hold their long arms in place but fortunately everything worked out well in the end (as you can see in the clip below).
Malice was the trickiest one here as I wanted to somehow incorporate the soul tokens and magnetize them as well. After toying with the idea for a longer while I came up with a solution. Unlike the original version, in which the tokens are glued the the area surrounding the cortex, I placed magnets in two different places, one on the armor above the head and the second one in the middle of the (I've no idea how to call this part, guess I'll just refer to it as 'exhaust pipe' until I've found the proper name). The third soul token can be placed in the rocks on the base. After painting I will glue some static grass around it so that the whole won't be visible.
I glued the additional element to the harpoon as I saw no way it could be magnetized. Still, I don't think it would make using the model as Reaper impossible.


And to wrap things up, here's a short video showing how it all works out in practice.

Thursday, 10 February 2011

Revenant Crew Rifleman attachment

Looks like the Revenant Crew is going to get more firearm support. PP showed a few Upcoming Releases today and the Rifleman is one that I like the most, check him out:

The undead Cryx minis are absolutely amazing, they're one of the main reasons I chose this army. I'll be definitely buy this one, along with the whole crew but I need to deal with my backlog first. Speaking of which, the plastic helljack has already been magnetized and is almost ready for painting. I will post an update soon.

Monday, 7 February 2011

Jack in the Box part I


Well, maybe not that kind of jack. Anyway, I finally have some time to lay my hands on the Cryx helljack plastic set that's been waiting deep in the drawer for a few months. I've already painted the metal Slayer from the battlegroup box. It was fun but I think I would have done it differently now. The model is great but the way I put it together doesn't make it look dynamic at all. This time I want to do some conversions, bend it into a more dynamic pose and of course magnetize it.


That's how it looks like at the moment, all the parts waiting to be used (I forgot to put up Malice's parts for the pic. Some serious drilling will take place now, though I won't get medieval on this one ;) I have a pretty good Idea how to do it, so stay tuned :)

Saturday, 5 February 2011

Wrath Engine

PP has finally revealed how the Wrath Engine looks like. I totally dig it, the sculpt combines technology with the unique, somehow alien, Cryxian look.


If you want to read more about it, check out the latest insider on PP website.

Sunday, 9 January 2011

A quick battle report


After several weeks I finally had a game of WARMACHINE. Once again I played against my brother's Protectorate of Menoth. Since neither of us has played for a longer while we decided to play starter vs starter. So it was: Denny, Slayer 2x Deathripper, Defiler and Kreoss, Crusader, Revenger and Repenter.
I started by quickly moving the bonejacks ahead to make sure I get a chance to use their arc nodes. It was a good idea as I quickly managed to hit Kreoss with Defiler's sludge cannon. As a result, my opponent was forced to roll each time he activated Kreoss to see if the corrosion has worn off. Fortunately for me, it never did and he kept losing valuable damage points. The tokens from PP I bought a while ago proved very useful as they clearly show the situation and the lasting effects of spells/damage. I lost at least two games simply because I would forget about these.
After my initial success my opponent hit back with all he had and after using Kreoss's feat managed to quickly turn the Slayer into a pile of scrap metal and did some serious damage to one of the Deathrippers. Still, I managed to block the way to Denny and keep the remaining active arc nodes in position for the final turn. I went for all the marbles and moved Denny closer to chickens and used the feat. I followed this by casting crippling grasp and a shot of poison from the Defiler who somehow remained functional after surviving attacks from both the Crusader and the Revenger. Kreoss who was already wounded couldn't have possibly survived that.
It was a fast-paced and pretty competitive game. Three big cheers go to my brother who is an excellent teacher when it comes to explaining the rules. What's more, he doesn't take advantage of his superior "procedural knowledge". Still, playing against him always proves a challenge.

Monday, 3 January 2011

The bigger they are...

PP is running a special Battle Engine week during which they will be presenting new resin models for Warmachine. I have to admit they do look impressive and can't wait to see models for other factions.The first one to be presented is Khador Gun Carriage (see pic below and the Insider at PP's website here).

Monday, 20 December 2010

Cryx taking to the skies


Just released on the PP website. An entirely new Cryx 'jack. Looks very interesting and I will definitely buy it once it's available :)

Wednesday, 15 December 2010

BLT and his swarm

I've finally managed to deal with some of my own backlog. I've painted the remaining four bane thralls which means that the unit is now complete. I wanted to give them a cohesive look that would combine metallics with purple (a color of choice for my Cryx army - I'm trying to add a touch of it, at least to the units). I basically speed painted them as I only want a solid tabletop quality for my units, otherwise it would take ages to paint them all.
I really like the sculpts, the fact that they are all multi part means that there's great potential for alternative poses. I tried to give each of them a slightly different pose. Still, my favorite part has to be the skull, I like the brow-like thingy around their eyes, gives them a kind of demonic look (of course in the WM-tongue-in-cheek way). So, here's my first complete WM unit.

Hopefully other units will follow in the future. I'm thinking about Bile Thralls as I like the sculpts and they have some potential within the game. But then the Satyxis Raiders look even more impressive. As you can see, the hobby aspect is the most important criterion for me ;)
Bane Lord Tartarus was a challenge. First of all, the sculpt. Lots of parts that needed to be glued in a position that made painting some of the areas of his armor a bit tricky.
Before painting I quickly checked for some background information on the model. This sometimes helps, at least it can give some inspiration. In this case it turned out to be a good idea. As a human, Tartarus was known as Horfar Grimmr, a powerful Molgur chieftain who suffered an agonizingly slow (one month of "purifying" tortures) death that was supposed to remove the taint from his soul. His tormented soul wandered in the shadows for centuries to be retrieved by the lich lord Tenobrous who joined with remains of some of the defeated warrior-kings. Together with a rune-inscribed armor and the unholy axe Rivender, he became a force to be reckoned with. His most impressive skill is the ability to travel easily between the human and the spirit realm.
This story is nicely reflected in the game as he can turn killed warrior into a grunt in his Bane unit. With Reach, Weapon Master and special attack (Thresher), he is able to wreak havoc in the enemy lines (at least before he's taken down since he's not too tough...).
Knowing the background, I tried to give him a more ghostly look. I also wanted to make sure that he stands out among the Bane swarm. started with the whirlwind-like thing at the bottom. I liked the effect and decided to add more of a similar color on the model. I ended up making it a bit too bright but I'm rather pleased with the effect anyway. It took me a while to come up with an idea to paint his axe. Initially I wanted to give it a greenish-blueish look but in the end decided that some variety would be a better option. My younger brother said that now it looks a bit like a living organism. I like this idea :)
Now I have another batch of the Easterlings waiting for me. Archers, cavalry and two banners. I think I'll end up finishing them in January as the last days of December will probably be quite busy.
Almost forgot - for today's music corner, a song that somehow seems suitable ;)

Wednesday, 10 November 2010

Tempted

The Privateer Press holiday wishlist has arrived and I have to admit - it's quite interesting. Nice army bundles for each faction (together with plastic templates and tokens). Nice selection there, definitely a great way to get into WM/Hordes or to expand your army.


The whole P3 color range.


Still, what I find even more interesting is the Formula P3 Paint Set. I have quite a few paints from various producers. I paint a lot, which means that I have to replenish my resources from time to time. I've been recently thinking about buying a complete paint set. It would make painting much faster and more efficient (more colors=less mixing). P3 paints seem to be the perfect choice here as they combine quantity of paint (18 ml compared with 17 ml - Vallejo, 12 ml - Citadel) with excellent quality. There's a lot of pigment in the paint so you don't need to put too many layers to get a solid color and the paint stays in perfect consistency even after a long time (I've had some P3 paints for a few years now and they're good as new). Of course, I've had experience in using different paints. I was also considering Reaper paints (nice bottles, perfect consistency, good quality) but the bottles are bit smaller and they tend to clog after a while.
So, it seems like P3 paints may be a good choice, especially taking into account that I will be painting a lot of PP minis (I'm working on my Cryx army and in the future I will possibly start a Hordes army - I'm thinking Trollbloods). The only thing I don't like much about them is the lid design. The plastic tab is hard to open and after using it for a while it's easy to get some paint on your fingers while opening it. Still, the advantage is that the paint stays good for a longer time.

Now, what do you get in the P3 Paint Set? Basically, that's the whole range of paints, all of the colors + some bonuses. These include three paints and a DVD about Core Techniques. Together with shipping it makes about 240$ This is tempting...
Has anyone bought any of these holiday bundles? If yes, did you have to wait long for the parcel? (I know this was put on PP page yesterday but I guess some people might read this post after a while).

UPDATE:


I've just noticed that there are no metallics among the paints in the set offered by PP. However, I came across an interesting online store in the USA, theworstore.com. Their offer is even better. You get all the paints for 165$ (only the metallics are not there but they are replaced by Vallejo Game Color paints - Polished Gold, Glorious Gold, Bright Bronze and Brassy Brass). Nice offer indeed. The only thing that bothers me is that it's in the USA, which means that if I wanted to buy it, I'd have to pay much more in fact (taxes suck). It's not that bad though, as there are ways to skip this nasty part of the deal (and the guys at thewarstore write about it explicitly in their FAQ).

Saturday, 23 October 2010

Winds of Change

There, it's done. The winds are blowing. Took me longer than I had expected to get round to it but I've finally added a few changes to the structure of the blog. I tried to put more emphasis on the functionality and the new layout is supposed to reflect this principle. I've removed some bits that I didn't really like about Blogger (navbar, a separate blog header) and I've also chosen a different template. I hope that the new arrangement will be clearer and will make it easier to follow what's new at Independent Painters. There are still some things that I need to work on (I'm still thinking about the colors of text in the topic of an entry and the date, the banner should blend in better with the backgroung etc.). Big thanks go to Stan (the same guy who created the banner for helping me out with some technicalities). Also, I should point out that the background comes straight from the Jungle - it can be found (with several other at http://massivevoodoo.blogspot.com/2010/05/photo-backgrounds.html). If you have any suggestions about the format, layout or content of the blog feel free to leave a comment!


Now, back to hobby-related stuff. I've finally found some time for a game of Warmachine. This time it was my entire Cryx force (the painted part of it - I try to use only painted models while gaming) against a quickly assembled Menoth force based on Reznik.


I should definitely try to get more opportunities to play as it's so easy to forget the rules... I haven't played since holidays! Anyway, we (me and my younger brother) decided to play an open game and try to quickly lead to a clash without hiding around. To make a long story short (please forgive lack of details here as it was my... fourth game ever and I was mostly busy trying to remember the rules), here are some of my thoughts after the game;

- I have definitely misused the Bane Thralls and waited too long to use them in game. Their charge came too late and they failed to inflict serious damage,
- Pistol Wraith is cool and if used carefully can make enemy units' life more difficult,
- I have failed to take advantage of arc nodes as I pushed the chickens into the fray, which rendered them pretty much useless (Bastions do hit hard, especially when they are boosted by some offensive spells).

A bit chaotic and not too cohesive, I know. As I said, I'm still mainly focused on learning the rules and developing some tactics. Time for detailed battle reports will come sooner or later (or much later).


An unexpected guest drops by to check out the situation on the table.


The decisive moment came when I decided to use Denny's feat and charge the remaining two Deathrippers into Reznik. I only needed to get rid of a single and wounded Bastion that was standing in my way. I activated the Pistol Wraith, hit him once and managed to roll two one's for the second shot. Clearly, the gods of dice were against me on this day. Still, it was a very enjoyable game with the momentum shifting from one side to the other on a few occasions. Hopefully, more games will follow in the nearest future! I'll finish at this point, leaving you with a very nice live version of the classic from the title of this entry.

Related Posts Plugin for WordPress, Blogger...