Tuesday 29 January 2013

Hobbit WIP #1

I've started my winter holidays so before packing my things and going for a well deserved holiday I'd started working on the Hobbit stuff.
First off, something big, fat and ugly. The commissioner suggested using the throne for this one and I couldn't wrap my head around it. It seemed too small to fit the Great Goblin in. Here's the first mock-up version of the idea I had.

My little helpers keep vigil, as always
In order to make it work I needed to prepare more "stones". Fortunately, I have a big supply of wine corks. My friends and colleagues at work know that I use them for hobby and every now and then bring me a handful :) I also used a part of wooden floor to extend the surface a little further so that the Big Ugly could stand on it comfortably. As you can see, there's a hole in the middle and below it there's a bucket full of... crap. Which leads me to a conclusion that the Great goblin was the first of the race to actually multitask as he was sitting, thinking, and... I think I'll cover the hole with some more wood as it doesn't really serve any special purpose for the display.


Having done that, I magnetized the King so that he could be placed either on his throne or on a regular base. That way he could be part of a display piece as well as a legit miniature for gaming.

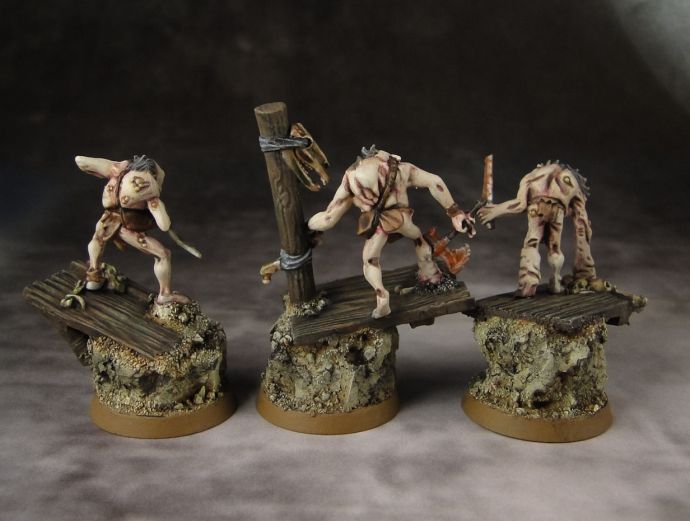
I also started working on the other goblins. The one in the pic below is, as far as I remember, a captain. He is very small and looks very mean so I thought I'd put him on a fancy base. Below is what I created using bits from the Hobbit box.


I also used similar types of bases for Thorin's company. I think they add a lot of dynamism to the minis and the way they're arranged makes it almost look like some kind of a diorama. I plan to smooth the edges of the hole in Bilbo's base and add some water effect inside once it's painted.


There's still plenty of GS that needs to be used to fill in the recesses and I will also add gravel and sand to their bases. Then I'll have my hands full of goblins. But that will have to wait as I'm leaving for a week tomorrow. Until then, keep the paint flowin'!

Saturday 26 January 2013

The Illuminated WIP

I'm currently focusing mainly on the Hobbit stuff but I try to work on some of my Malifaux backlog in the meanwhile. I started working on the last of my Illuminated and while painting her I noticed that the gaps at the sides of her dress are clearly noticeable after some highlights. I thoughts I'd got rid of them but turns out that only black undercoat isn't that good for showing things like these.


Lesson learnt. I had to go over these with GS one more time.


I wasn't sure about the choices of colors for her dress and hair and started considering other options. In the end I chose a bleached purple for the dress. The pic is bad as I took it in artificial light but I'll take a better one once it's finished.


Painting her face was tricky with the tentacles glued in and I knew that I basically had one shot at getting the eyes right. I think I've managed to do that.

I also started working on the evil tadpole. Not sure where I'm going with it but at least it's some start...


Wednesday 23 January 2013

Goblins revisited

I added a few changes and I think that overall it's an improvement. I basically repainted the wooden platforms using darker browns, added some black pigment to the stones, repainted the ugly boils using basic skin tone, got rid of the red around the eyes and chose a softer, warmer color for the base rim.


I'll start preparing the rest during the weekend. Can't wait to get started on Thorin's company!

Monday 21 January 2013

Sample Goblins from the Hobbit

Taking pics in winter isn't easy as I never get home before it's dark and I need to rely on artificual light. Also, sometimes there are other obstacles.


Onto the little buggers now. I more or less stuck to the codex look. In the movie they seemed to blend in with their environments so I tried to use various shades of similar colors to reflect that. Took me forever to choose colors that I thought worked even before I started painting. Garfy's great article came in handy too - go check it out on the Tale of Painters. I normally start with a black basecoat but chose a white one here.


Now only 33 left to go :)

Sunday 20 January 2013

Thumbs up for Evil Baby Orphanage

Hope everyone has had or is having a great weekend. Today I (together with my wife and two friends) finally tested the game. None of us has ever played it before and I had read the rules (not too long - just one two-sided A4 size piece of paper) a few hours before the game started.
The game is tons of fun. Rules are fairly simple and after one turn everyone knew more or less what they had to do and how to assign toys/special cards to their benefit.
In Evil Baby Orphanage players take on the roles of Time Nannies - a highly specialized professionals who travel in time and kidnap little babies before they become real villains in order to "prehabilitate" them.

Somewhere in the middle of our game

The game is very dynamic and the situation can change from "almost winning" to "totally losing" within a second. I really liked this dynamism as it kept us plugged in.
Another thing that everyone liked a lot were the cards or the artwork to be more precise. Evil children look like caricatures of famous historical villains and some of the special rules refer to a given character's history directly.
I can highly recommend Evil Baby Orphanage as it's easy to learn, the gameplay is very intensive and sudden bursts of laughter seem to be unavoidable. If you want to learn more about the rules check out the videos below:


Thursday 17 January 2013

Om nom nom

That's probably the sound that this manifestation of brilliance is making as it's consuming a human.


That's just the seventh plastic mini from Wyrd that I've painted but it's already my favorite. Some really fantastic details on this one. Everyhing looks great, beginning with the pants and folded material there, nicely sculpted chest and face and ending with the monster thingy.

Putting it together was a bit of a challenge but all the parts fit together nicely. Not much to say really, just a great mini and I enjoyed painting it thoroughly.


This one also glows in the dark


I've started work on Gobling from Hobbit but in the meanwhile I plan to push with my Malifaux backlog so you can expect more stuff soon.

Sunday 13 January 2013

Running into (Dark) Debts

I finally started working on the Dark Debts crew. My first step was to give the speed painting on the Wyrd forums a go with an Illuminated. I think I could have chosen a better model for that as I used black and white on this one and these color tend to need slightly more time to get them looking right. After one hour the mini looked like in the pic below:


I guess I'm not cut out for this kind of painting competitions as I had really hard time cutting corners on this one. In the end I kept on painting after the hour passed and some time later this came from under my brush:


It also glows in the dark - brilliance ladies and gentlemen :)


Even though my attempt at speed painting was a failure I still enjoyed the experience and it encouraged me to start making some more (slow but systematic) progress on my Malifaux backlog. Right now I still have 31 minis from the range that await painting.

Hobbit WIP at least

I've finally started working on the Hobbit box. So far I've prepared three sample goblins for painting. I used wine cork for the rock on the bases and cut up some of the scenery from the box. I was thinking about the movie scene and the way Goblin Town looked in the movie.


It seemed hastily done with the planks randomly placed here and there. Everything seemed ready to break and I tried to imitate that look here.


I'm also thinking about putting Thorin's company on similar bases and perhaps arranging them into a small diorama on a movement tray.


Saturday 12 January 2013

Greenskins - the final update

Here I am, 30 goblins later. You can see the pics below. Once again, I was struggling with taking pics that would show the colors well. It looks a bit too vivid and too flat compared to the real look...


While working on a large quantity of similar minis, I always try to add little things that decrease the "army of clones" feel. This time I used things like rocks, ruined monuments etc. to add some variety. Also, to give it a Moria feel, I used fragments of walls and glued them onto the movement trays.


For the command group I wanted to come up with something special so I took half of a column and cut it into four parts. These parts were then glued to the bases so that it looks now as if the 4 of them were standing next to one another.


And some shots taken in different light.


 Well, that's it for now and I'll be posting some WIP pics of the Hobbit stuff soon.

Friday 11 January 2013

Cyberpunk 2077

If you haven seen it already, check it out, a teaser of a game that the creators of Witcher and Witcher 2 are working on:


I strongly suggest watching it in HD

Saturday 5 January 2013

Greenskins WIP #5


The work on greenskins continues. It's a bit tiresome as I'm working on a large batch simultaneously. In order to maintain solid level on all of them I need to constantly keep on reminding myself to slow down and pay attention to details. It sounds simple but it can become frustrating at times when you apply a layer of the same color on 30 minis in a row.

I'm generally leaning towards P3 paints and plan to buy more colors from the range in the future but there are some Citadel colors that I'm really used to. Two paints I like in particular were Scorched Brown and Vermin Brown. While the new Skrag Brown seems close enough, Rhinox Hide is not even close in hue to Scorched Brown.

Equivalents?
What are your impressions of new (well, not brand new as they've been around for a while) Citadel colors?

Friday 4 January 2013

Kingdom Death: Monster


This game has been a huge success since the beginning of its Kickstarter campaign, quickly reaching one stretch goal after another. Today (3 days before the end) it has reached one million dollars. Now that's impressive.
It's a cooperative game based in a very dark world full of horrors. You play together as survivors who try to stay alive. There are already two short movies giving more insights into the game. The first one is very general and shows some basics.


The second one goes into details and explains the gameplay more precisely.


For $100 you get the game (+ the shipping costs which amount to around $40 if you're from Europe). There and quite a few fantastic models in the box and the quality of the cast seems outstanding.

It's very tempting but I guess I'll pass. The game will be released in fall but it's not like I have nothing else to work on until them. In fact, it would interfere with my current hobby projects. Other than that, the shipping costs are pretty high and I hope once the game's officially released, it might be cheaper to order it (as long as it's available in Europe). Anyway, for all those who look for a cooperative game that they could enjoy with their friends, I'd say you're definitely going to get your money's worth if you support this project. Check out its page on Kickstarter.

Related Posts Plugin for WordPress, Blogger...