Wednesday, 12 September 2012

I had too much to dream last night...


That's the song that immediately comes to my mind when I think about this master.
My second master that I want to start using - the Dreamer with his best friend, Lord Chompy Bits. Basically it's a kid who met an ancient godlike creature called Nytmare in one of his dreams. The demon would normally torment souls that he chanced upon but this time the boy proved not only resilient but also very powerful.


I wanted to make LCB's skin look ugly and ancient. That's why I decided to highlight it this way, followed with several brown/flesh/purple glazes.
The Dreamer was more straightforward as I just wanted him to be much brighter and "cleaner" than the rest of his nightmares.I also wanted to give him a little twist and placed him on the front of his base, leaving more space for his shadow. His base is only 30mm so there isn't really much space. Still, I tried to paint a very simplified, as seen by a child, image of LCB there.

Here are two additional pics showing them from the bird's eye view.


Playing them should be fun but a challenge to. The Dreamer/LCB is one of the most complex masters in Malifaux and requires a firm grasp of the rules to use him effectively. I chose him as I like the models a lot and the fluff is quite interesting too.

And to finish things off, here are two Stitched together.


Monday, 3 September 2012

Teddy!


Here's another Neverborn beast. One of my favorite sculpts in the range. The moment I saw him, I knew that sooner or later I was going to buy and paint it.


I struggled a little with the fur. Normally while working on minis that have fur elements I tend to use drybrushing. I didn't work well here as the contrasts were too big and it looked as if it was randomly touched by a brush with bright color over the dark one. I repainted it, this time starting from a bright color (mix of GW Dheneb Stone and Reaper Khaki Shadow). This was only lightly drybrushed with Dheneb Stone. From that moment on I worked on making the fur look darker. I did that by applying several washes of AP Soft Tone (watered down) and Strong Tone in the recesses. I was tempted to paint "FREE HUGS" (read this idea somewhere on the Wyrd forums) but ended up painting a simplified tartan pattern.


After that it was just a matter of painting its lovely happy face. I used much brighter green for the eyes. I know that this color doesn't fit the rest of the colors too well but I thought that an element of contrast here would make the Teddy look a bit crazier.
To finish things off, I wanted to add the blood effect. That was when Arlaharen's great article came in handy (check it out here). I added blood after varnishing the mini to male sure it looked fresh. Working with P3 inks using this method allowed me to get the effect I liked - realistic and gory.


The only thing I don't like that much about Teddy is that he's quite flat when you look at it from the side. Other than that it's a fantastic, evil and twisted mini.

Friday, 31 August 2012

Army of the Dead

I had thought that it would be a quick and easy job before I started working on this bunch. White primer, some washes, drybrush and all's done. Well, in the end it was a bit more complicated than that.
I started by preparing the bases - adding larger stones/boulders and sand. The minis were primed separately with AP grey basecoat. I followed it with a light spray of white, which added some basic highlights.

Then it was washing time. After a wash of Vallejo Green Shade, I glazed them with thinned down Guilliman blue. The only exception was the king's coat which was given a very light touch of red. I had to be careful here as adding too much of it would result in a pinkish shade which wouldn't work well at all with this one.
I decided that they need a bit more depth and worked a bit more with Vallejo Green Shade. After that it was just a matter of bringing them back to bright colors and making them look more ethereal. I used P3 Underbelly Blue with increasing amounts of white for that, finishing off with a very light touch of pure white. The hairs and beards were painted using more natural colors and I think that in the end it worked out well too.

In the end what was supposed to be a quick and easy paintjob has proved much more complicated. The trays were meant to tie them with the rest of the Gondor force, while still giving them a slightly different look. OK, enough talking, here are the pictures.


Plastic warriors of the dead are quite nice with lots of features to make each of ten models look unique and the plastic is really strong and doesn't break easily. The metal ones (especially the riders) are just fantastic and I really enjoyed picking out the details on these miniatures.
Now I'll probably paint at least a few Malifaux minis but with the end of summer holidays and September being the busiest month for me, it might be hard to find as much time as I'd like to spend doing that.

Monday, 27 August 2012

Pure Evil

I painted another few minis from Malifaux range. This time something from another faction that I'll be playing - the Neverborn. The Neverborn are basically human fears and nightmares personified. They often take forms of mythical creatures or they remain humanoid, finding their pray among the peoples of Malifaux. I figured I'd start my Neverborn with the most abominable of them.


Those three little ones are the Dreamer's totems. I had a blast painting them. The sculpts are really great. They seemed a bit too small on a regular base so I added a chest/barrel. They also served as test models for bases that I'll be using for my Neverborn crews. Each of these took about an hour to paint so they were fairly quick paintjobs.


While it's nice to make them more unique by preparing themed bases for each crew, I wanted to be able to mix them easily when preparing crews for gaming. Basing all of the minis from this faction on the same type of base gives me more versatility and it also means that whatever crew I come up with, it will always look more or less coherent.

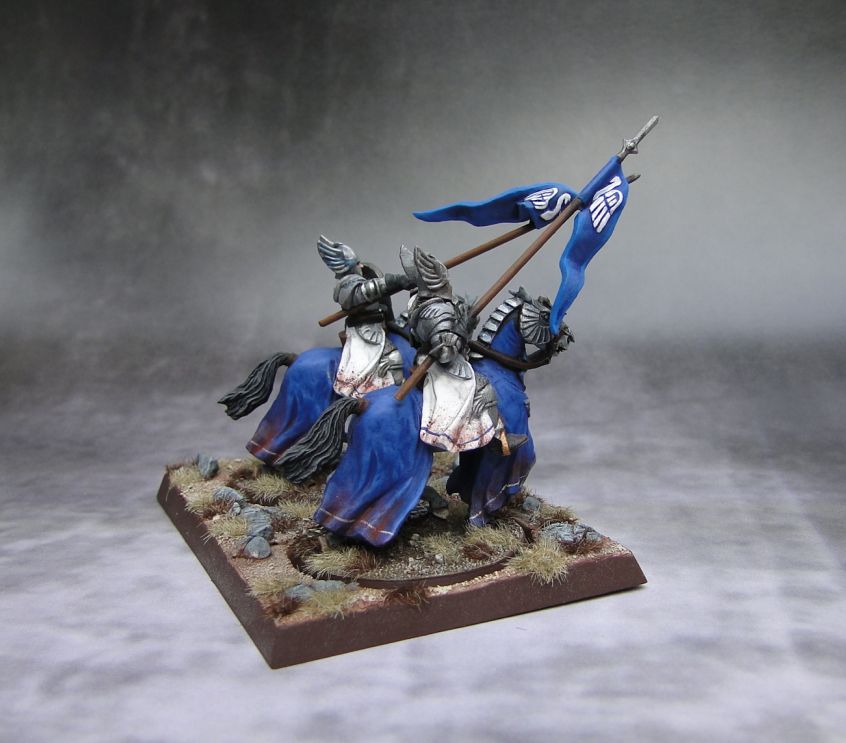
Knights of Dol Amroth again

This time plastic mounted versions. I wrote about earlier that initially I wasn't too impressed by these as they seemed too bulky and less detailed than the old metal versions. Now that I look at them, on finished bases and themed movement trays, I think they're not that bad after all.

The Knights aren't glued to the mounts as I wanted to make adding a rider to the mount more flexible.  
The saddles might seem a bit too flat but these elements are almost completely covered by knights' tunics so I didn't worry about that and focused more on the edges that are visible.
They add a nice touch of blue to the otherwise slightly too uniform (at least in my opinion) Minas Tirith army and should make a nice addition to other heavily armored units.
Not much more to say really so here are the pics of the whole six.


I probably don't need to add that the banner bearer was my favorite to paint - the pattern there is really nice and it did take quite a few layers of paint to get it looking right.
Now, onto some undead warriors!

Friday, 24 August 2012

Malifauxed

I can now officially admit that I've been roped into the game. I've been a fan of the minis from this range for a while but after playing a few games I feel that I've found the system to focus on.
Since I decided I will be playing Malifaux for a longer time, I needed to make a few purchases. I spend a lot of time painting my miniatures and wanted to make sure they're well protected when I carry them to play somewhere else than my place. Battlefoam immediately came to my mind. I used to have a bag for WARMACHINE produced by this company and it was great. So I went ahead and ordered one for Malifaux. Here are a few pics:


The material is very solid and the sides are made of canvas strengthened on the inside with plastic. Everything fits in nicely inside; two fate decks, counters and laminated cards. There's also plenty of space left for a tape measure, marker and a book (or two since in can be put inside from both sides).


The bag comes with three foam trays, two regular sized ones for most of regular ht 2 minis and one thicker that can be customized (as seen in the picture above). There are 76 slots on the smaller trays and as many as you can pluck to suit your crews in the big one. It means that you can easily fit 4-5 crews inside of it (maybe with the exception of NLCB and some of the avatars).

The bag dimensions are 12.5W x 10.5L x 7H" (318W x 266L x 178H mm) so it's fairly small and easy to carry, especially with the strap that is connected to the bag with metal clips.

It's not a cheap purchase (I got mine at waylandgames for £62.40) but I think it's definitely worth the money.

I also bought two fate decks - a Puppet and a Retro one. Both are plastic so shuffling them is much easier and faster than with paper ones. They are definitely going to be be more durable too. And last but not least - the graphic design. It's wonderful. While the Puppet deck has bright, vivid colors with puppet imitations of Malifaux characters (Viktorias are the Jokers), the Retro deck has a very classy feel to it. It can be easily used for regular card games as are the suit colors and symbols are the same. To make them better adapted for Malifaux, figures such as king also have a number next to the suit symbol. Also, the damage is marked by dots (* for weak, ** for moderate and *** for severe). I find it a bit clearer than the dots on Puppet deck (a dot at the bottom of the number - weak, in the middle - moderate, and severe if the dot is on the top).

A quick look at two plastic fate decks
Now I'm off to enjoy the weekend but I'll be back at the beginning of next week with an update on my LotR commission.
Related Posts Plugin for WordPress, Blogger...